Taking a screenshot is an easy task and this is the right place but for those who are looking to find out the quick and easy ways to take screenshots on a PC or computer system. Here, here we will discuss and tell you about how to take a screenshot on a desktop PC easily or even take a full page screenshot for both Windows as well as iOS operating systems.
As mentioned above taking a screenshot is an easy task, however, some people might find it difficult to instantly take the screenshot especially when you are in the middle of an online meeting or working on some other program where it is much easier to screenshot as compared to note down the details.
Furthermore, let us tell you about the most common as well as easy ways to take screenshots in the Windows operating systems then we will continue with the iOS laptops and computers.
Take a screenshot in Windows by using the print screen key
No matter which version of Windows you use, you can use the simplest way to take a screenshot by pressing the “PrtScr” that can be found in the first row of function keys.
All you have to do is first press the “Ctrl” then the “PrtScr” key. Once you have followed this simple step you just need to open Word doc. or any Word pad then press “Ctrl” and “v”.
Now, you will see that the screenshot will be posted on the document.
In case the “Ctrl” plus “PrtScr” is not working then you can try the “Fn” key with “PrtScr”, it will work out.
Just remember that using these keys will take the screenshot of the entire screen which can be pasted anywhere and you can even edit the screenshot by past paint or any other picture editing program which allows you to crop, resize or even change the file type like png, jpg and other formats.
If you simply want to take a screenshot and save it as an image then you can press the Windows key plus the PrtScr key which will save the entire screen as an image.
Snipping Tool to take screenshots in Windows

Another flexible method to take a screenshot of the entire screen or just the part of anything open on it by using the simplest tool that comes preinstalled in Windows OS is the snipping tool.
There is one thing for sure once you will start using the snipping tool then you will like it so much that you will find it one of the best and will hardly use the other methods of taking screenshots as it is very easy to use and you can take a screenshot of a selected area or the entire screen instantly.
So, let us tell you how to use the Snipping Tool to take screenshots?
Steps to use Snipping Tool
Step 1: Open the start menu and select the snipping tool from the list
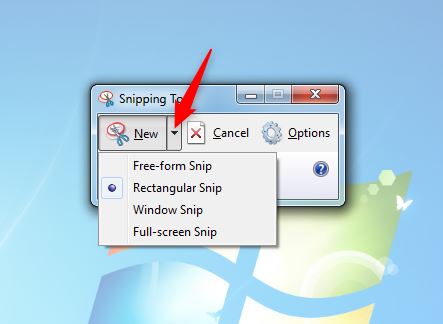
Step 2: Once the snipping tool is opened, click on the new options which will show different modes from the dropdown list which has the following options
- Free form snip
- Rectangular snip
- Window snip
- Full-screen Snip
Step 3: You can choose any option accordingly
Step 4: After selecting one of the above options, it will freeze the screen then drag the cursor and select the area for which you want to have the screenshot of
Step 5: All you have to do is select the specified area or the entire screen and it will instantly take the screenshot in the image form
Step 6: You can save the screenshot image at any location or simply paste it even in email, chat or any other place
If you have an Apple Mac and instantly want to take a screenshot then you can follow the below steps.
Step 1: Press “Shift” plus “Command” plus “3” together
Step 2: Once you have completed the above steps, it will take the screenshot, it can also be edited by clicking the thumbnail which can be seen on the desktop
To take the full page screenshot on Mac you can press “shift’” plus “command” plus “4” together, now drag the cursor and select the area of the screen that you want to capture.
To edit the screenshot you can click on the thumbnail on the desktop
All the screenshots are saved on the desktop with the name starting as a screenshot along with time and date!
There are many more shortcuts and methods to take screenshots on Windows and Mac but we have explained the basic, simple yet fastest way of taking screenshots of the whole screen or the selected area along with editing options.
The best part of the above methods is that they are easy to remember and once you use them two or three times then you will never forget them in any situation.
If you feel that there are other simple and easy ways that are faster than you can comment and let us know, we will include them as well!
If you feel that the above information has helped you then do not forget to subscribe to us and like the article to get more interesting updates like this one.
Please like and share if you find the info useful!
#Techtrimmer #WindowsScreenshot #MacScreenshot #HowtoTakeScreenshot #SnippingTool
